Gearheads and Tesla fans, buckle up!
If you've been dreaming of beefing up your Tesla's looks and slicing through the air with even more style, you're in the right place.
At AusBody Works, we’re pros when it comes to all things body kits and we’re throwing open our garage doors to share the ultimate DIY playbook for decking out your Tesla.
This isn't your average mod guide; it's a deep dive into transforming your ride from factory to fierce with your own two hands.
Whether you're a modding newbie or a seasoned vet in the custom car arena, this guide is your ticket to a Tesla that turns heads and breaks norms.
We're talking about rolling up your sleeves, getting your hands dirty, and unleashing the true potential of your electric beast. From prepping your battle station (aka your garage) to the nitty-gritty of fitting those sleek new lines onto your Tesla, we've got you covered every step of the way.
Ready to give your Tesla the edge it deserves?
Let's dive into the heart of the process, where precision meets passion. This guide will walk you through the entire journey - from selecting the right tools and creating the perfect workspace, to mastering the art of the perfect fit and finish.
It's all about making your Tesla as unique as your vision, with a little help from the experts here at AusBody Works. Let's crank up the tunes, crack open the toolkit, and start this transformation. Your Tesla is about to become the stuff of legend.

The Installation Process Unveiled
So, you’ve taken the steps to upgrade your Tesla with a body kit from AusBody Works and now you’re ready to leap into installation. Here’s what you need to know.
Being well-prepared can make the process smoother. As anticipated, the first step involves gathering all necessary tools and materials. Equally important is preparing the workspace, which should be well-lit, adequately ventilated, and spacious enough for manoeuvring around the vehicle.
To steer clear of common installation errors, it’s crucial to:
- Use a detailed installation guide or manual.
- Remember, a well-done installation requires precision, so skipping the dry-fit step or using incorrect tools can lead to unfavourable outcomes.
- Lastly, symmetry and precise measurements are key to achieving a professional-looking installation.
Preparing Your Tesla for Transformation
Before commencing the transformation, it’s essential to adequately prepare your Tesla for body kit installation. Start by creating an ideal workspace that is well-lit, adequately ventilated, and spacious enough to comfortably manoeuvre around the vehicle. The next step involves removing the factory-installed bumpers and side skirts using a comprehensive set of tools, making sure to keep a systematic record of the removed parts.
But that’s not all. Here are some additional steps to follow when installing a body kit on your vehicle:
- Thoroughly clean the surface where the body kit components will be installed to ensure it is free of dirt, wax, or residue that could affect adhesion.
- Use painter’s tape to protect the paintwork around the areas where body kit components will be installed to prevent damage during the process.
- Perform a pre-fit of the body kit components before painting to confirm fitment and inspect for any imperfections.
Following these steps will help ensure a successful installation of your body kit.

Attaching New Elements with Precision
When attaching new elements of your selected body kit, precision is key. A professional installation and strict adherence to detailed instructions from the manufacturer are crucial for a precise and secure fit of body kit elements. Additionally, ensuring all fasteners and adhesives are compatible with the Tesla and the body kit materials is vital for a strong bond.
The installation process typically includes the following steps:
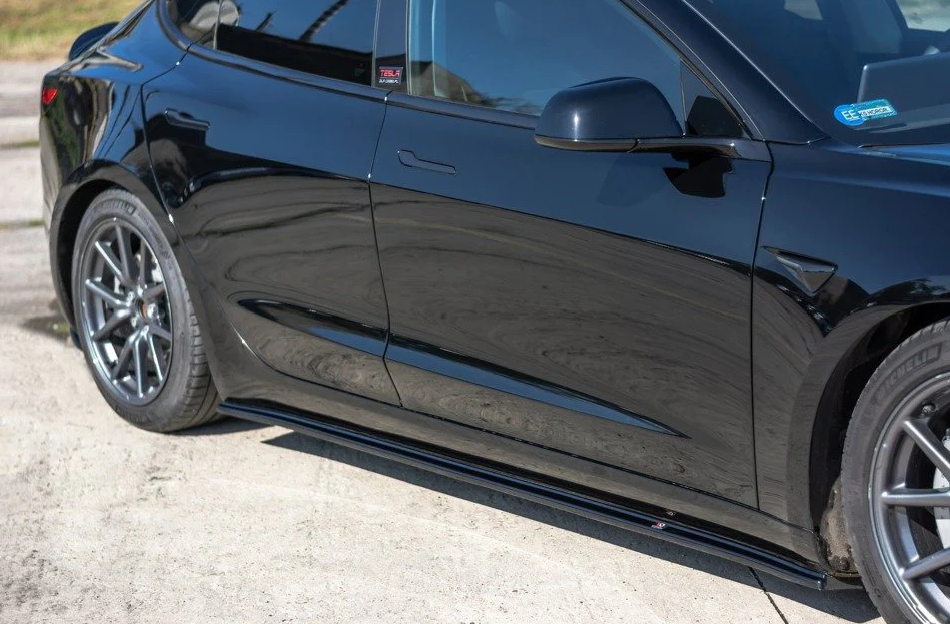
- Begin with the side skirts, securing them with double-sided tape and screws.
- Install the front and rear bumpers using the provided hardware, ensuring the rear bumper is properly aligned.
- Finish with supplementary elements like the rear spoiler, using appropriate tools according to the guidelines.
- For secure attachment of new elements like rear diffusers, additional hardware may be required.
- Emphasize the necessity of precision and symmetry throughout the installation process.
Finishing Touches for a Sleek Look
As you approach the finish line of the installation process, it’s time for the final touches that will give your Tesla a sleek and polished look. Once all body kit components are installed, alignment and symmetry should be double-checked using a measuring tape and level, and all screws and bolts should be tightened to secure the components in place.
An essential part of the finishing touches is ensuring a cohesive and stylish look through a final visual inspection, assessing the overall appearance from different angles, and making necessary adjustments for seamless integration of the body kit. From there, the body kit is ready for the following steps:
- Painting
- Application of clear coatings
- Application of gloss finishes
- Application of a protective wax or sealant
The final step includes cleaning the body kit to remove fingerprints, dust, or residue, and taking a test drive to confirm that the Tesla’s performance and handling are not adversely affected by the new modifications.
Why you should consider professional installation of your Tesla Body Kit
Diving headfirst into customising your Tesla with a sleek body kit is a thrilling ride, but when it comes to the actual installation, leaning on the expertise of a professional can make all the difference. As you can see from the info we provided above, it takes a lot of work.
There's a certain art to ensuring every piece aligns perfectly, achieving that seamless look that makes your car stand out.
Professional installers bring a level of precision and know-how to the table that's hard to match on your own. They have the tools, the tricks of the trade, and the experience to avoid common pitfalls, ensuring your body kit not only enhances your Tesla's aesthetics but is installed to last.
Opting for a pro means you get to enjoy the excitement of transformation without the stress of the intricacies, guaranteeing your Tesla turns heads for all the right reasons.

Buy Tesla Body Kits from Australia’s Leading Body Kit Specialists
At AusBody Works, we're all about helping you make your Tesla look awesome.
We've got a huge range of body kits that'll make your car stand out and turn heads wherever you go.
Whether you want something sleek and subtle or bold and eye-catching, we've got you covered. We're the go-to guys in Australia for Tesla body kits for Model Ys and Model 3s, and we're here to make sure you get exactly what you're looking for. Let's make your Tesla the coolest car on the block!